
Model Byrå 2.5 DC Mk. I
Manufacturer Engineer F. Batllo, Barcelona, Catalunya
Distributed by Fernando Batllo, Barcelona, Catalunya
Series / Num. Series s / n
Year of manufacture 1954
2.47 Displacement DC (0,151 cu. In.)
Diameter 15 mm. (0.591 in.)
Race 14 mm. (0.551 in.)
Diesel Power class
times 2
Fixed type carburetor (no speed control)
Rotatable rear intake valve
No inner bearing
Outdoor Bearing No
If crankcase crankshaft on
Crankshaft on bronze No
Ether Fuel / Oil / Oil
Good Condition
Comments The first commercial engines Byra. Based on the model of the Youth Front (F) but changing the intake, which in this case is by rear rotary valve. Steel jacket, mehanita piston, crankshaft directly on the crankcase and aluminum rotary valve. The engine has been donated to the collection by Jaume Fortuny Palou.
The picture and data above courtesy of the JM Rojo collection.


Rebuild Story Courtesy of YouTube Channel Valic000.
Published on 28 Mar 2015
Welcome back to a real big one this time. It was a bit quiet here on my channel as I was really busy. I have so little time left...for my hobby but this story made it all good, at least I hope so! :-)
Many thanks in first place to all you folks out there who follow my work and rebuilds. Its really nice to meet so many different people around the globe. I made friends in the UK, Germany, Canada, Spain and many other places. This rebuild was not possible without those people. If I never had meet Jose or Jesus I never would have heard about the Spanish BYRA engines. In Spain there are also a lot of interesting engines made. Fernando Batllo made several types of the Byra. A 4,5 and 5 cc side port, but that's another story...that I will get to soon.
Check out the channel of Jesus (sherpa copter) for a test run of the 1949/50 Byra 5cc diesel car-unit and the 4,5cc! https://www.youtube.com/watch?v=K2kPL... Spain is well known for the Paya diesel, an ED Competition copy, also the fantastic and famous ZOM engines range, soon more about them here on my channel. In Spain they are calle "Ollieta" (lovely). This comes from the fact, that the engine has the 2 best features of these UK engines..the ETA+ Olliver Tiger. And they are real screamers! Then in addition there is the Llam engine that is a Webra Mach2 copy and it performs outstandingly. Llame means actually "Flame" Then of course the great Perres team racing engine range...a big quality built engine from the Perres brothers. I am sure that there are more, but those are the engines, that a lot people known of.
I show in this clip, of how I make a new crankshaft and a cylinder. I hope you like this huge rebuild and I make mistakes for sure and also must still improvise a lot, but slowly the results get better and better.
The next step should be a casting..and from there a complete engine from scratch...I hope to find the time to do it..as I have a lot of ideas and plans for the future.
Thanks for watching and enjoy the clip. Many thanks also again to Jesus for all the help and info...and for the engine of course.!!! Till the next project!


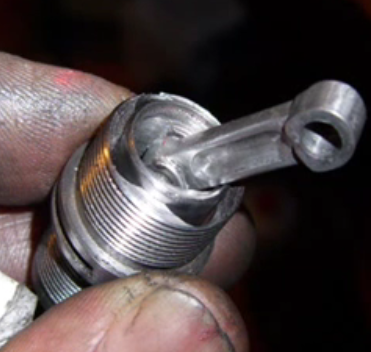
The crankshaft is partially broken and the thread on the cylinder is very bad condition.


Arrow points to location of a crack.


The threads of the shaft are non standard and the nut is unique and impossible to replicate so it needs to be protected from loss.

The partially machined shaft is cut off and the crank pin located.


excess material around the crank pin is cut away to reduce the extent of grinding required to form the pin.


Transfer slots are roughed out in the new cylinder.


Cutting the exhaust ports in the cylinder.


Boring the cylinder in steps using progressively larger drill sizes.


Milling out the excess material in the cylinder using special cutting tools.


Cutting the threads in the cylinder for mounting the head.

Head test fitted to the newly cut threads.

Special honing tool for improving the surface finish of the cylinder wall.

View of the partially finished cylinder showing the oversize fuel transfer slots.

Finishing the cylinder wall is a time consuming process where we use olive oil with the grinding agent.

First we make a perfect cylinder then we add a 1/100 mm taper at the top.

Lapping piston into cylinder.

Cylinder wall is now approaching that glass like finish that is required here.

Above we are grinding the piston to near final size.

Checking the piston's diameter with digital calipers.

Measuring and marking the piston's cutoff height.

Drilling the grunion pin hole in the piston using an adjustable support to react the pressure of the drill and avoid distortion.

Old piston shown on left with partially manufactured on right.

Machining the piston top to final shape.

The next job is to make up new connecting rods. These are machined from old automobile pistons where the piston tops are usually thick enough to make most rods. The pistons make a good source of material because they are made from high strength aluminum.

Drilling the big end and top holes in the rods.

Setting up to turn the rod to a cylindrical shape.

Rod taking shape and almost ready for cutting to length.

Machining a new grunion pin from a broken drill bit.

The pin is made a little oversize (.012mm) to assure its retention when installed in the piston.

Above we have dress fit the pin into the new piston with the connecting rod fitted.

A tight fitting gasket is fashioned from shim stock to help seal the bearing housing from pressure loss.

Gasket installed in the front housing and is held in place by a spring which is placed between it and the bearing race.


Above the crank shaft and bearings are installed.

Piston assembly awaiting installation with lubrication slot shown in the connecting rod's big end.

New spray bar installed in the intake tube.


Engine fully assembled and ready for a test run.

Close-up view of intake with a specially designed spray bar to improve fuel atomization.

Because the original head was damaged we also made a new one for our rebuilt engine.


Fully assembled and ready for the first test run.


Running strong on a high oil fuel mixture to aid the run in process without incurring damage.