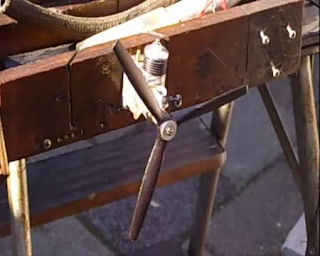
Data: Type: Reverse-Flow scavenged two cycle with shaft rotary valve induction. Weight: 2.25 oz including radial tank mount. 1.7 oz less tank, but with crankcase back plate fitted. Displacement:0.496 cuin.or 0.813 cc. Bore:0.400 in. Stroke: 0.395 in. Stroke to Bore Ratio 0.9875 : 1. Specific Output as tested: 1.55 bhp/cu in. Power to Weight Ratio: 0.548 or 0.725 less tank. Manufacturer: K&B Manufacturing Corp. 12152 Woodruff Avenue, Downey, Ca.


The rebuild engine has a pulled out connecting rod and we have the option of creating a conventional piston and rod set-up with a wrist pin arrangement, but we discover that the dimensions are almost exactly the same as the Cox 049 parts so we elected to modify a spare piston and connecting rod to fit the K&B.
The Cox piston's diameter is just a little bit larger than the stallion's
The Stallion's piston diameter is measured below.
Below we see the measured diameter of the Cox piston.
I have decided to regrind the cylinder and the piston by about 15 one hundredths of a mm must be ground off in total.
Here we start to make a special lapping ring from aluminium alloy for shaping and finishing the piston.
Now the holes are drilled completely through.
The next step is to use a slit saw and split the ring along the the axis direction.
Now we need a bored threaded hole for the tightening screw.
The hole is spot-faced to provide a flat surface for the tightening screw's head to sit on.
After the boring is done, a 2.5 mm thread is tapped by hand to exert pressure on the piston.
he lapping ring is now complete.
Drill out a wooden dowel and press fit it into the lapping ring for holding it during the grinding operation.
The piston is resurfaced in several stages and polished to its final size.
The honing arbor for the cylinder is made of brass.
The 2.5 degree taper insert is made from steel.
We can now regrind the cylinder with fine diamond grit paste.
After the grinding process the surface has a mat like finish.
In several stages the cylinder is honed smooth, to improve the surface finish it is lapped with 1 micron diamond lapping compound and later polished.
The rear face of the crankcase was not entirely flat so some grinding is required here too.
Still a bit more grinding is required at the top.
Below we see the head after milling the hexagonal a bit; before it was badly worn, now its the right size for a 7 mm socket.
The engine is now reassembled however we find that some final fine lapping is still required to get the right fit.
My cat Puckie senses that its time to go away and hide again, because pretty soon things are going to get noisy around here.....another test run.
After many hours of work we are finally ready for a first test run of Jose's rebuilt Stallion.
Watch the rebuilt 1/2 A stallion do its first bench run.
https://drive.google.com/file/d/0Bw2P1xgqAWCuMlBxMWdVTk9BZE0/edit?usp=sharing


No comments:
Post a Comment